Web API with OWIN, Bootstrap and AngularJS from scratch - part 1
As with my posts ASP.NET Web API from scratch part 1 and part 2 from a while ago, I thought I would go through setting up a similar bare-bones project using an empty Visual Studio 2013 ASP.NET Web Application as the starting point but adding AngularJS and Bootstrap into the mix.
One other subtle change is that I will use OWIN as the basis for boot-strapping and configuring Web API as this seems to be the most up to date way of doing this, and I guess will be the default in Visual Studio 2015 anyway.
As always, using the pre-configured project templates in Visual Studio is prefect for getting up and running quickly, but I don’t think there is any substitute for breaking things down to the bare minimum and building them back up again, as this will often take away many of the unknowns and give ourselves a better understanding of what is really going on under the covers.
#File, New Project… For starters, let’s open up Visual Studio 2013, choose File, New Project… and select Visual C#, Web, ASP.NET Web Application. Give the project and / or solution a name e.g. AngularWebApi and click OK.
Another option I keep checked on as a habit these days is the ‘Create new Git repository’ as there really is no downside to having a fully functional Git repo even when working on little tests and ideas.
As we want to build this up from scratch, select the Empty template and make sure all the ASP.NET project options are unchecked:
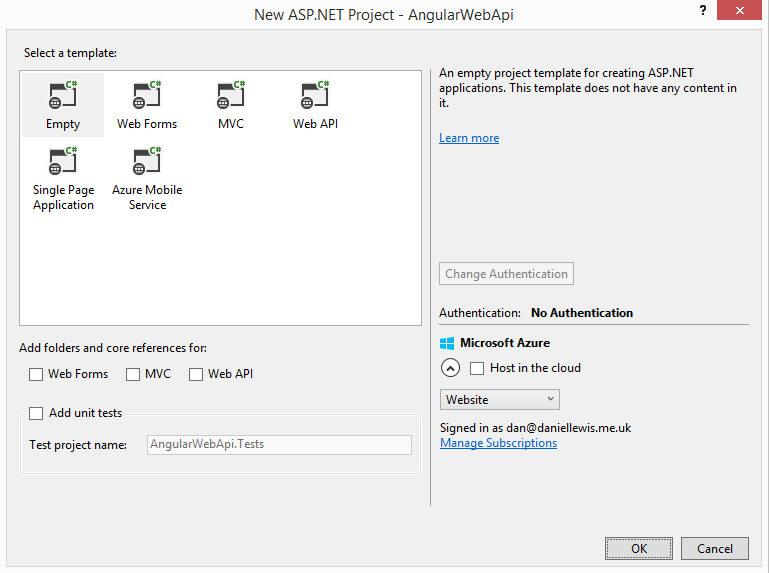
You should be presented with a wonderfully sparse and empty ASP.NET Web Application project (yes, it does exactly what it says on the tin!)
#Golden NuGets Next, let’s load in all the NuGet packages we will need for a bare minumum project ASP.NET Web API using OWIN, Bootstrap and AngularJS.
I prefer to use the Package Manager Console window (View, Other Windows, Package Manager Console) but feel free to use the Manage NuGet Packages… option by right-clicking on the project name and intalling them through the dialog.
Here are the commands / packages to install
Install-Package Microsoft.AspNet.WebApi
Install-Package Microsoft.AspNet.WebApi.Owin
Install-Package Microsoft.Owin.Host.SystemWeb
Install-Package jQuery
Install-Package Bootstrap
Install-Package AngularJS.Core
#OWIN (will I, will I be famous) Once these packages have been installed, we need to configure Web API by using the new OWIN startup method. Briefly, OWIN is an initative to split out the roles of web servers and web application frameworks allowing frameworks such as Web API to run without understanding how it is actually being hosted i.e. it could be on IIS (SystemWeb), inside a console app or service (self-host) or even something like NodeJS if a suitable OWIN host was developed.
From a day to day perspective, the most visible change a developer will see is using an OWIN Startup class file such as Startup.cs rather than the traditional Global.asax.cs / WebApiConfig.cs combination.
Right-click on the Project file and select Add, OWIN Startup class and call the class ‘Startup’ (the default is actually called Startup1 which is a little annoying).
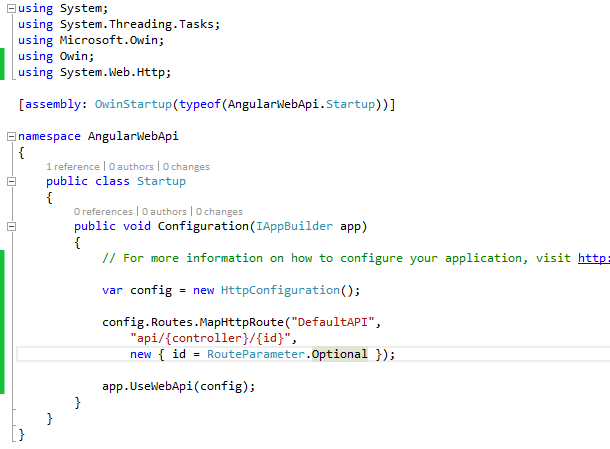
From this point on, it will look very similar to configuring Web API as normal, so just add the following lines into the predefined Configuration method:
var config = new HttpConfiguration();

config.Routes.MapHttpRoute("DefaultAPI",
	"api/{controller}/{id}",
    new { id = RouteParameter.Optional });

app.UseWebApi(config);
(Remember to resolve HttpConfiguration as it is in the System.Web.Http namespace)
The final code file should look as follows:
More information on OWIN can be found on this Getting started with OWIN and Katana article on the ASP.NET web site
#Web API Controllers
In order to get some data into our Angular application, we’ll create a very simple Web API controller that returns a list of People. In subsequent parts, we will expand the functionality to include detail, create and edit pages.
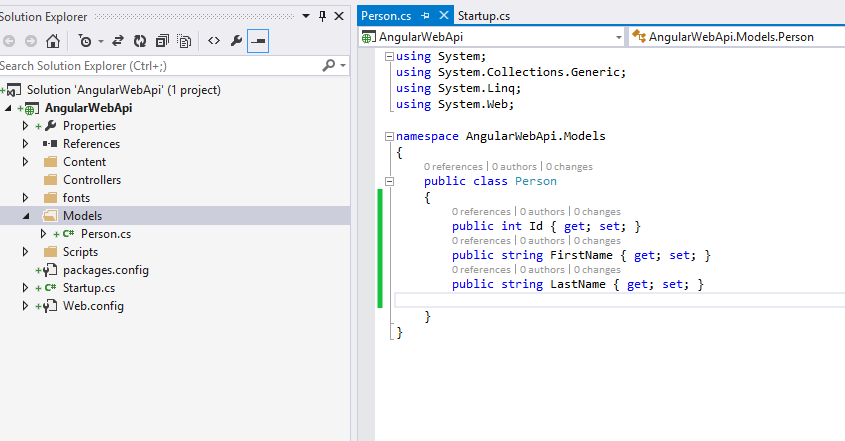
For now, create two new Folders in your project called Models and Controllers.
Inside the Models folder, create a new class called Person.cs and add Id (int), FirstName and LastName (string) properties:
Now right-click on the Controllers folder and choose Add, Controller… Web API 2 Controller - Empty. Call it PersonController (or PeopleController if you prefer!)
We’ll create a simple in-memory static list of Person objects, and return them via an IHttpActionResult from a Get method as follows:
private static readonly List<Person> people = new List<Person>
{
	new Person
    {
    	Id = 1,
        FirstName = "Homer",
        LastName = "Simpson"
    },
	new Person
    {
    	Id = 2,
        FirstName = "Marge",
        LastName = "Simpson"
    },
	new Person
    {
    	Id = 3,
        FirstName = "Bart",
        LastName = "Simpson"
    },
};

public IHttpActionResult Get()
{
	return Ok(people);
}
At this point, you can run your project in Visual Studio and navigate to /api/Person and see the JSON response from Web API (IE will try and download the response as a .json file)
#Bootstrap
As the bootstrap files have already been added by the NuGet package above, we can simply add a new HTML page and getting going straight away. I find the best place to start with Bootstrap is by using the basic template or one of the examples on http://www.getboostrap.com.
For now, I am going to add a new HTML file called index.html into the root of my project and copy and paste the basic template into this. The only thing we need to fix-up are the reference paths to the Bootstrap CSS and JavaScript files but this should be a simple case of renaming css to Content and js to Scripts e.g.
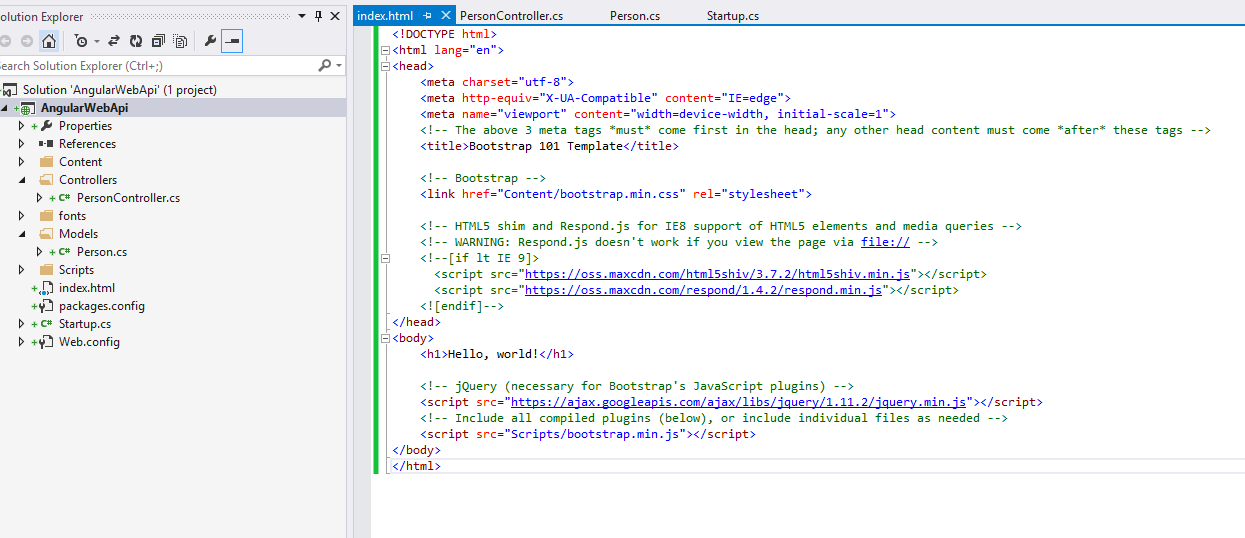
You can optionally change the jQuery script reference to point to your local copy or continue using the Google CDN hosted version.
Run your project in Visual Studio and you should see Hello World displayed in the Bootstrap font. If not, double-check the CSS file reference is correct.
#AngularJS
We now have everything in place to start using Angular. First, we need to add a reference to the AngularJS script which has been installed by NuGet:
<script src="Scripts/angular.min.js"></script>
AngularJS itself has no external dependencies but does include a cut-down version of jQuery called jqLite. However, if you are using the full version of jQuery and Angular detects this, it will use this instead. In order to do this, ensure you include your Angular reference after jQuery.
Now we have angular referenced, we need to add the ng-app directive to our page which instructs angular to take control of that part of the page. Often you will find this directive placed in the html or body tags, but it is worth noting you can put this in any isolated tag on the page and Angular will only target the elements between that tag.
For our needs, we’ll place it in the html tag e.g.
<html lang="en" ng-app="app">
Next, let’s add an Angular controller into the page so we can display table of people.
We’ll create a new div tag that wraps the existing h1 tag and replace the Hello World text (if you used the basic bootstrap template) with the angular binding syntax
Inside the new div tag we’ll add the ng-controller directive with a value of “PeopleListController as vm”
We’ll also add a table which will use the ng-repeat directive to create a table row for each person.
The full code to insert is as follows:
<div ng-controller="PeopleListController as vm">
	<h1></h1>
    <table class="table table-bordered table-striped table-responsive">
    	<tr>
        	<th>First name</th>
        	<th>Last name</th>
        </tr>
    	<tr ng-repeat="person in vm.people">
        	<td></td>
        	<td></td>
        </tr>
    </table>
</div>
Now we’ll add a new script tag under the existing ones and define our angular module. We wrap it all in a IIFE to prevent any global variables from leaking out. Also remember that we still need to provide an empty array even if we have no dependencies when defining an Angular module:
<script>
	(function() {
		var app = angular.module("app", []);
    }());
</script>
Next we’ll add the controller which has a dependency on the $http service in order to make the call to Web API
<script>
	(function() {
		var app = angular.module("app", []);

        app.controller("PeopleListController", ["$http", PeopleListController]);

        function PeopleListController($http) {
        	var vm = this;

            vm.title = "People List";

            activate();

            function activate() {

            }
        }

    }());
</script>
And finally, we’ll make the call to Web API inside the activate function, by using the $http service that has been injected:
  function activate() {
	$http.get("api/Person").then(function(response) {
    	vm.people = response.data;
    });
  }
#Conclusion So there we have it, a starter project using Web API, OWIN, Bootstrap and AngularJS starting from first principles and building up just about the most basic application we can do.
I haven’t gone into specific details around the use of AngularJS as this was not the purpose of the blog post. In future parts, I hope to add more functionality to this project and will likely spend some more time on the Angular fundamentals and also look to refactor the angular parts into their own js files using some better “best practices”, specifically following the excellent Angular Style Guide put together and maintained by John Papa.