Developing Office 365 SharePoint Apps with Napa and Kendo UI - Part 2
##About Kendo UI Kendo UI is a set of HTML 5 controls / components offered by Telerik which are, at least in my opinion, the spiritual successor to Telerik’s long history of ASP.NET Controls but targeted at the modern world of client-side HTML 5, CSS and JavaScript. The Kendo UI suite offers a number of core framework features such as MVVM, validation, a data source component and routing, in addition to your normal batch of web components such as a grid, data/time pickers, sliders etc. The full Kendo suite also covers data visualisation through Kendo DataViz, and a set of mobile specific components called Kendo Mobile.
Telerik also supplies various flavours of server-side wrappers (ASP.NET MVC, JSP, PHP etc) for Kendo, but I will not be covering these as a) using Napa to create SharePoint Apps forces us to use client-side technologies and b) I am not personally sold on the usefulness of these wrappers short of making quick use of the controls while developers get up to speed with using them in a pure JavaScript context.
A full overview of the Kendo UI suite is out of the scope of this particular post, but more info can be found on the Kendo UI website.
Telerik offers trial, commercial and GPL licenses for Kendo UI, so unless you are using them in conjunction with another GPL solution, you will be limited to the 30 day trial version after which you will need to obtain a full commercial license.
One nice feature of Kendo is that you can link to a CDN hosted version which is licensed under the terms of the 30 day trial or can be used if you have a commercial license. For simplicities sake, and as I have a commercial license, we will link to the CDN hosted files in our examples.
##Integrating Kendo UI with a SharePoint App using Napa From the the Napa Developer Dashboard, which you can get back to from your main Developer site and running the Napa app again, open up the sample project we created in part one.
By default, the Napa project template adds a few default project items:
- Content/App.css - This is an initial empty CSS file you can use to house your app specific styles.
- Images/AppIcon.png - the icon image to be displayed in the top-left corner of your app pages.
- Pages/ClientWebPart.aspx - A sample “App Part” which can be added to the host web.
- Pages/Default.aspx - The default start page for your app i.e. where a user will be redirected to when they click on your App in the host web.
- Scripts/App.js - A default JavaScript file to store your app’s client-side JavaScript code and business logic etc.
Although not perfect, App.js isn’t too bad in terms of following some decent JavaScript principles, mainly, it specifies “use strict” so that ES5 compatible browsers enforce some more rigorous rules, and it also keeps the core application logic inside an IIFE in order to keep it out of the global namespace i.e.
(function () {
// This code runs when the DOM is ready and
// creates a context object which is needed to
// use the SharePoint object model
…
})();
Unfortunately both the context and user variables are declared globally which is big anti-pattern in JavaScript if we can help it. This could easily be improved using a namespace and / or module pattern, but we can look into these further on in the series.
Let’s go ahead and add references to the Kendo UI JavaScript and CSS files using the CDN.
Further info on using the CDN hosted files is available in the Kendo docs under the heading JavaScript Dependencies, and Derek Bailey, Developer Advocate for Kendo UI, also has a good blog post on when to use a CDN.
First of all, the current (2013.3.1119) release of Kendo UI depends on jQuery 1.9.1 or above, so we will need to change the default jQuery reference added to our Napa project. Luckily this is as easy as updating the referenced version from 1.8.2 to 1.9.1 e.g.
<script type="text/javascript" src="https://ajax.aspnetcdn.com/ajax/jQuery/jquery-1.9.1.min.js"></script>
Just below this line, copy a reference to the SSL CDN hosted version of Kendo:
<script type="text/javascript" src="https://da7xgjtj801h2.cloudfront.net/2013.3.1119/js/kendo.web.min.js"></script>
As SharePoint online websites are exclusively hosted over HTTPS / SSL, we will need to point to the SSL hosted versions, otherwise we will likely get security prompts from our browser warning about unsecure content etc.
While we’re here, let’s add references to the Kendo CSS files just above the reference to ../Content/App.css:
<link rel="Stylesheet" type="text/css" href="https://da7xgjtj801h2.cloudfront.net/2013.3.1119/styles/kendo.common.min.css" />
<link rel="Stylesheet" type="text/css" href="https://da7xgjtj801h2.cloudfront.net/2013.3.1119/styles/kendo.default.min.css" />
OK, we should now be in a position to use the full power of Kendo UI within our SharePoint app. To test this out, we’ll initialise a very basic Kendo UI Grid using a local array of data as the data source.
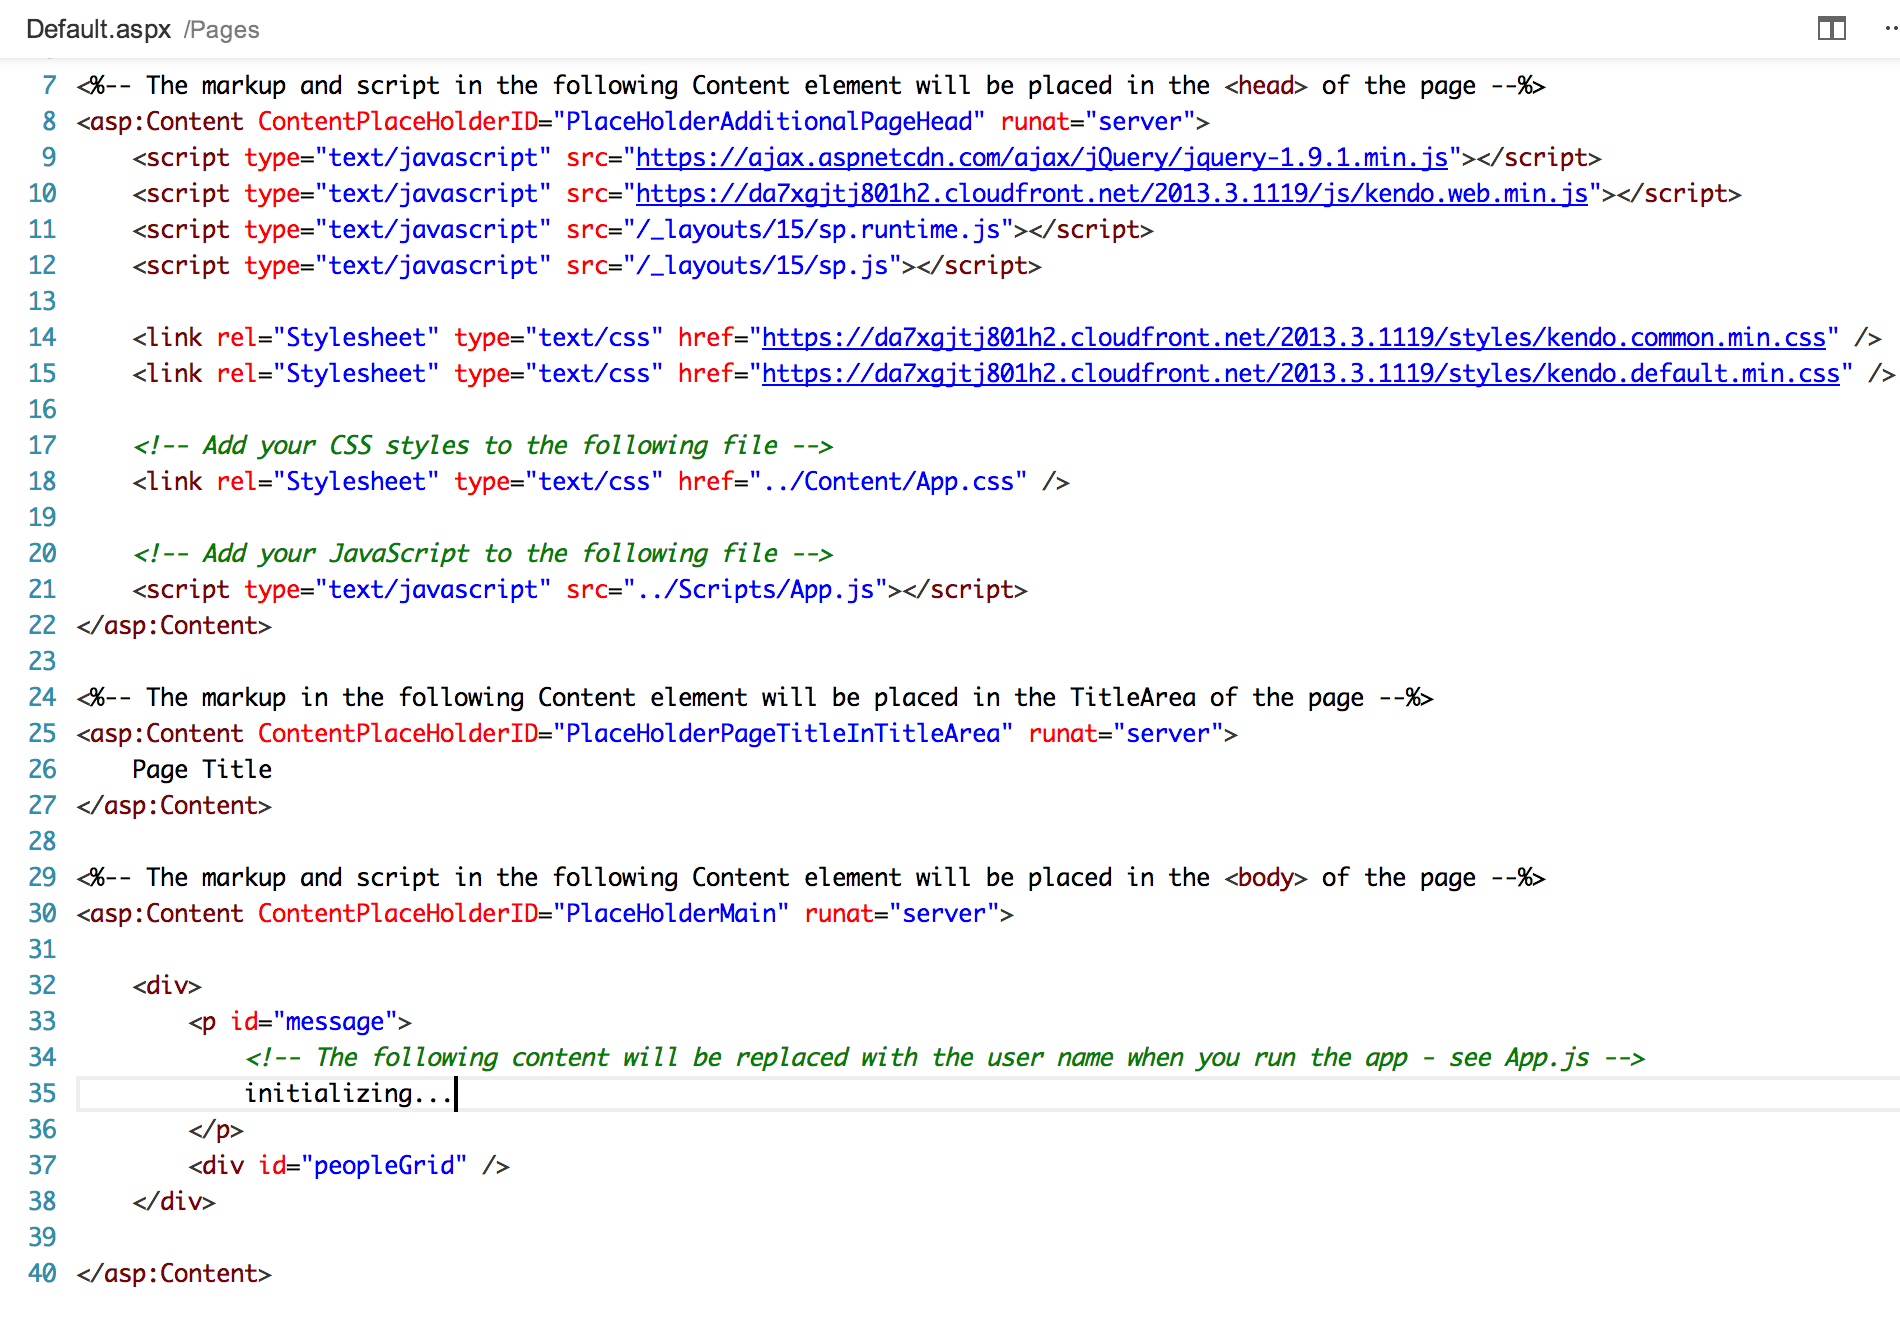
Still in the Default.aspx file, add another <div> just below the welcome message <p id="message"> and give it an id of “peopleGrid” e.g.
<div>
	<p id="message">
    	<!-- ...
    	initializing...
	</p>
	<div id="peopleGrid"></div>
</div>
The end result should look as follows:
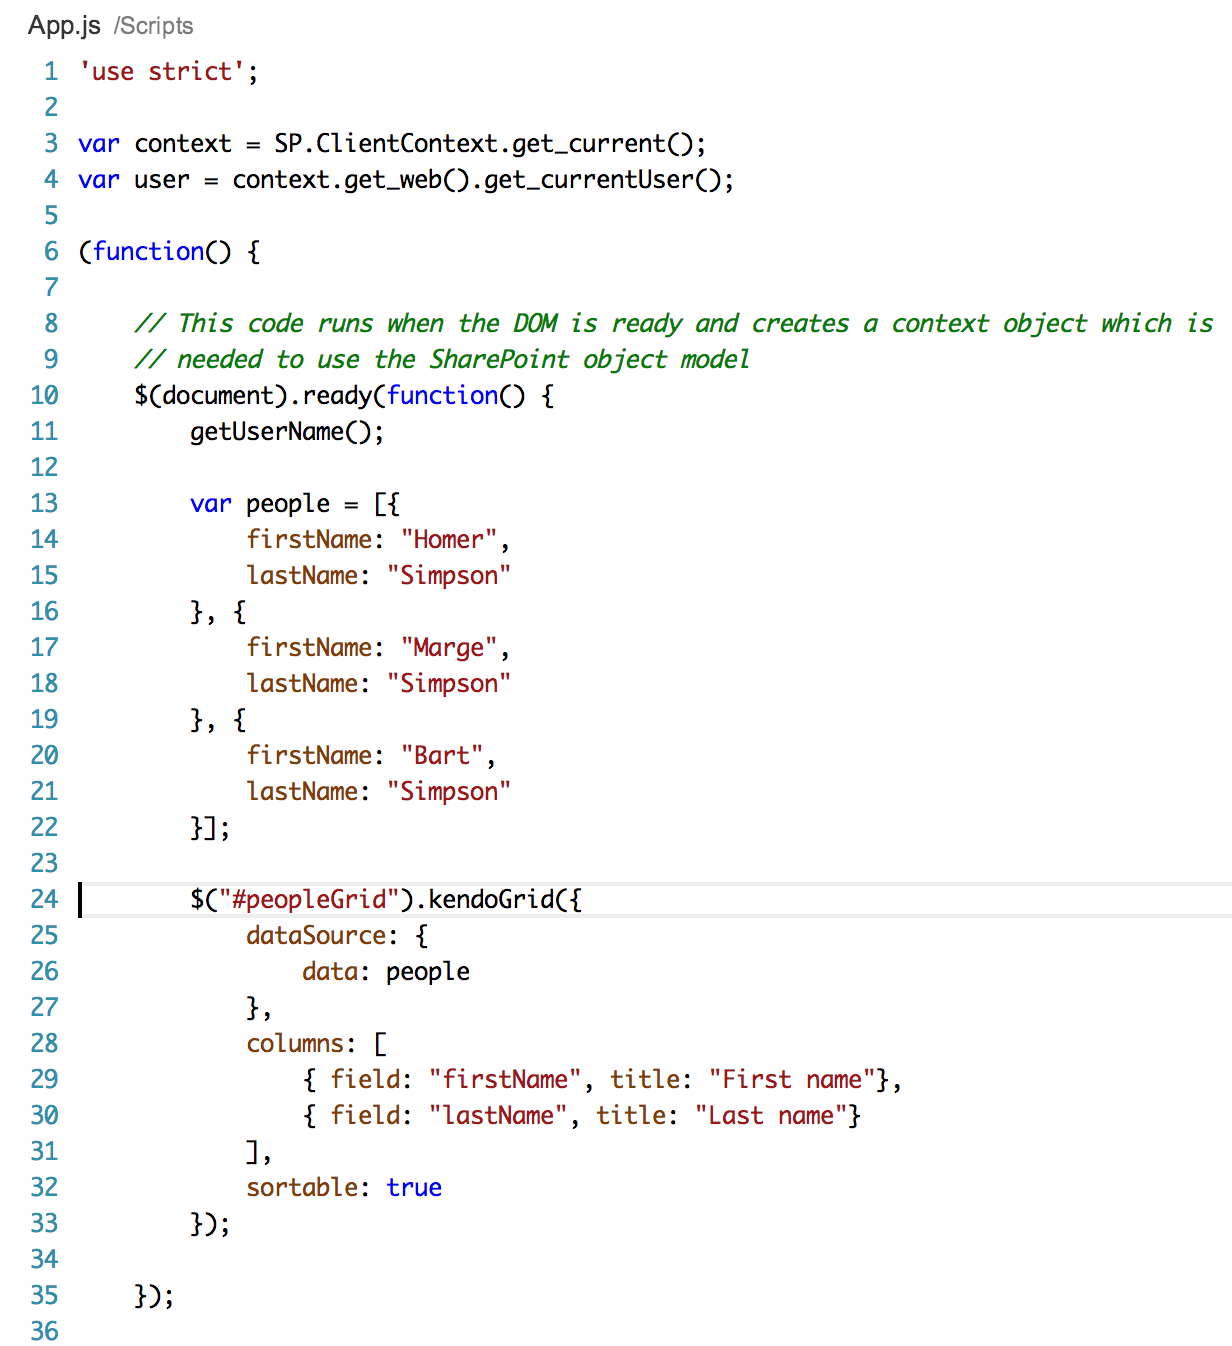
Now open up the Scripts/App.js file. This already includes a jQuery $(document).ready() function we can hook into, so just below the call to getUserName add a simple array of data e.g.
		var people = [{
			firstName: "Homer",
			lastName: "Simpson"
		}, {
			firstName: "Marge",
			lastName: "Simpson"
		}, {
			firstName: "Bart",
			lastName: "Simpson"
		}];
Now let’s turn the the div we created into a Kendo Grid using the data above as the data source:
		$("#peopleGrid").kendoGrid({
			dataSource: {
				data: people
			},
			columns: [
				{ field: "firstName", title: "First name"},
				{ field: "lastName", title: "Last name"}
			],
			sortable: true
		});
The final code should something like the following:
Now click the Run button to deploy and start your solution. All being well, you should see a Kendo Grid appear under the welcome message and user name:
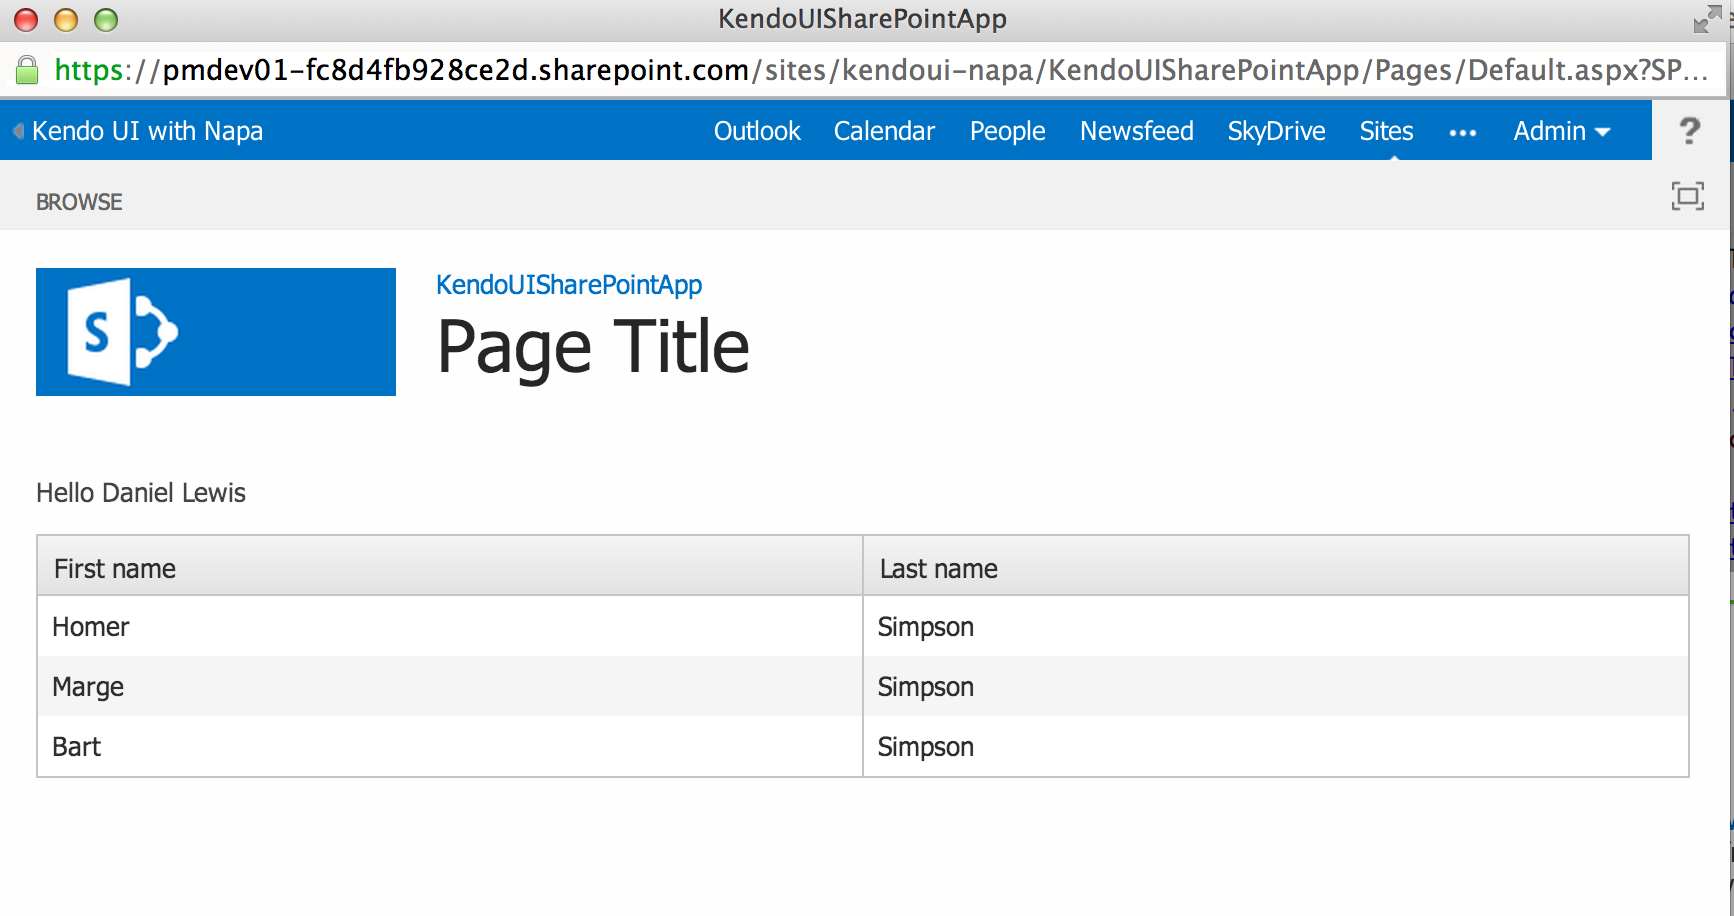
We have now proven just how quick and easy it is to integrate Kendo UI with a SharePoint app using Napa. In part 3, we will look at further using the Kendo UI controls to enhance the user experience by retrieving and displaying data actually held in a SharePoint site.